
Have you ever wanted your Windows 10 or 11 PC to resemble the sleek look and feel of a macOS device? If you’re drawn to macOS for its minimalist interface, clean top menu, and the iconic animated dock, you’re in luck! You can now achieve a macOS-like experience on your Windows PC with a powerful customization tool called MyDockFinder.
This app not only replicates the macOS dock but also brings in a range of features, including a translucent top menu bar, working Launchpad, animated dock icons, and even a glowing Apple logo — all without the need for any complex setup or system overhauls. Ready to give your Windows desktop a Mac-inspired makeover? Here’s how to do it step by step.
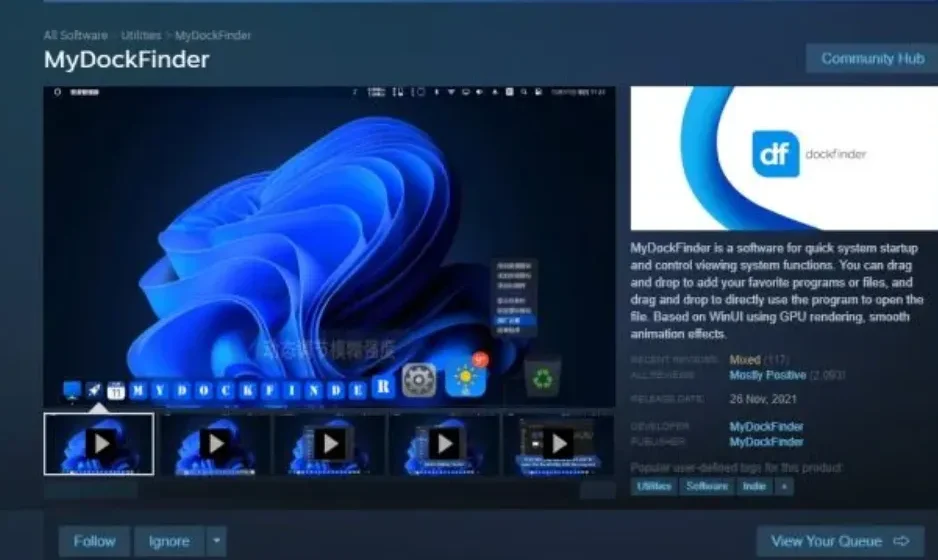
1. What is MyDockFinder?
Before we dive into the installation process, let’s first understand what MyDockFinder does. This tool is a desktop customizer that replaces your standard Windows taskbar and system tray with a macOS-style dock and top menu bar. Here’s what it offers:
- An animated dock that zooms when you hover over app icons, similar to macOS.
- A translucent top bar complete with an Apple logo and system menus.
- A Launchpad to view all apps in a grid layout.
- Options to customize icons, apply blur effects, and choose different themes.
MyDockFinder is ideal for those who love the aesthetics of macOS but still rely on Windows for their day-to-day tasks.
2. Setting the Stage: Adding a macOS Wallpaper
To really capture that macOS vibe, let’s start with a fitting desktop background. Start by downloading the latest macOS Tao wallpaper, a beautiful image that complements the sleek look of macOS.
Here’s how to set it up:
- Search for “macOS Tao wallpaper” online.
- Visit trusted wallpaper websites like WallpaperHub or Pexels.
- Download either the Light or Dark mode version of the wallpaper.
- Right-click on the downloaded image and set it as your desktop background.
- Next, right-click on your desktop, go to View, and uncheck Show desktop icons.
This will instantly clean up your desktop, giving it a more polished, macOS-like appearance.
3. Installing MyDockFinder
Now, let’s get MyDockFinder up and running:
- Install Steam: If you don’t already have Steam, head over to the Steam website, download and install the app, and create a free account.
- Find MyDockFinder: Once you’re logged in to Steam, search for MyDockFinder in the store.
- Purchase and Install: The app costs around $5 USD (or ₹300). After purchasing, go to Library > MyDockFinder > Install.
- Launch the App: After installation, click Launch to start using MyDockFinder.
The magic happens immediately — you’ll notice a macOS-style dock at the bottom of your screen and a menu bar at the top.
4. Hiding the Default Windows Taskbar
At this point, you’ll see both the Windows taskbar and the new macOS dock. To complete the transformation, we need to hide the Windows taskbar:
- Click on the Finder icon (the Apple logo) in the top menu.
- Select Hide Taskbar from the dropdown menu.
Now, only the macOS-style dock remains, giving your desktop a much cleaner and authentic feel.
5. Pinning Your Favorite Apps to the Dock
Let’s personalize your new dock by adding your favorite apps:
- Open the app you want to pin (e.g., Chrome, File Explorer, etc.).
- Once the app’s icon appears in the dock, right-click on it and select Keep in Dock.
- Repeat this process for all your frequently used apps.
Your dock is now set up with all your go-to apps, just like on a Mac.
6. Customizing the Dock’s Appearance
Now that your dock is set up, it’s time to make it look even more like macOS. Here’s how to adjust the appearance:
- Right-click on the dock and select Preferences.
- In the Appearance tab, check the option Make Dock use custom blur and transparency.
- Set both sliders to 10–15 for a frosted glass effect.
Next, apply similar blur and transparency settings to the Context Menu and Menu Section for a seamless look across the system.
7. Changing Icons to Match macOS
To make your icons look more like macOS, MyDockFinder allows you to use macOS-style icon packs. Here’s how to install them:
- In Preferences > Appearance, click on Icon Theme > Workshop.
- A new Steam window will pop up. Browse for the latest macOS Tao icon pack and subscribe to it.
- Once downloaded, go back to MyDockFinder’s Installed Themes, select the Tao icon pack, and hit OK.
Your icons will now be replaced with macOS-style versions, giving your system an even more authentic look.
8. Adding macOS-Style Animations
To make your Windows PC feel smoother, enable the macOS-like animations:
- Search for Animation Settings in the Start menu and turn on Opening and Closing animations.
- In MyDockFinder, fine-tune app open/close transitions for even more fluid motion.
These small tweaks will help replicate the seamless transitions that macOS is known for.
9. Adjusting Icon Size and Hover Zoom
To achieve that signature “magnify” effect for dock icons:
- Go to Preferences > Look & Behavior.
- Set the Icon Size to around 100 and the Scaling to 125%.
- Hover over the dock and you’ll see icons zoom in, just like on macOS.
10. Setting Up the Launchpad
To populate your Launchpad with apps:
- Go to Preferences > Launchpad.
- Click Add Apps and select Add from Start Menu.
- Right-click on the dock and choose Restart Dock.
- Click on the Launchpad icon again, and you’ll see a full grid of your installed apps.
Now, you can organize and manage your apps just like on a Mac.
11. Fine-Tuning the Dock Behavior
For a clean and distraction-free dock, disable minimized app previews:
- Go to the Minimize Effect section in Preferences and enable Minimize windows into their dock icon.
- Also, turn off Windows Preview to prevent Windows from showing hover previews.
This will make your dock look as minimalist and tidy as macOS.
12. Setting MyDockFinder to Auto-Start
To have MyDockFinder launch automatically when your PC starts:
- Open Preferences > General.
- Enable Start on Boot Method and choose Start as Service.
- Optionally, turn on Hide Taskbar on Boot to ensure the taskbar stays hidden.
Now, every time your computer starts up, the macOS interface will load instantly.
13. Performance and Resource Usage
MyDockFinder is designed to be light on system resources. It uses only about 0.1% CPU and 50-60MB of RAM when idle, which is negligible on any modern PC. It won’t slow down your system, even when running constantly.
14. How to Uninstall MyDockFinder
If you ever want to return to the default Windows look, uninstalling MyDockFinder is easy:
- Go to Preferences > General, and disable Start on Boot.
- Restart your PC to bring back the Windows taskbar.
- Uninstall MyDockFinder from Settings > Apps > Installed Apps.
Your system will revert to its original state, with no traces left behind.
15. Frequently Asked Questions (FAQ)
Q1: Is MyDockFinder free?
No, it’s a paid app on Steam, priced at around $5 (₹300). It’s a one-time purchase.
Q2: Can I use MyDockFinder without Steam?
While it’s available on Steam for easy updates, you can also download it directly from the developer’s website.
Q3: Will it slow down my system?
No, it’s optimized to be resource-efficient, even with constant use.
Q4: Can I customize the top menu bar?
Yes, you can adjust the blur, transparency, and even change the Apple logo color.
Q5: Does it support multiple monitors?
Yes, you can display the dock on one or all of your connected screens.
Final Thoughts
With MyDockFinder, you can effortlessly transform your Windows 10 or 11 PC into a Mac-like system. From smooth animations to the translucent top bar and macOS-style icons, it’s the perfect way to bring the best of both worlds to your desktop.
If you’re a macOS fan longing for that sleek, polished interface or a Windows user who just wants a cleaner, more elegant experience, MyDockFinder is the perfect solution. With just a few simple tweaks, you can turn your regular Windows system into a macOS-inspired masterpiece — no new hardware needed.